 blog
blog
Roof Leak vs Pipe Burst Water Damage: Key Differences
Table of Contents
- Roof Leak Water Damage vs Pipe Burst Damage: What You Need to Know
- How to Identify the Source of a Water Leak in Your Home
- Common Causes of Roof Leaks
- Common Causes of Pipe Leaks and Bursts
- What to Do After a Burst Pipe or Roof Leak
- Water Damage Cleanup and Drying Time
- Damage Patterns: Where Water Damage Appears
- How Quickly Water Damage Spreads
- Frequently Asked Questions
Last Updated: October 10, 2026
Roof Leak Water Damage vs Pipe Burst Damage: What You Need to Know
When water appears in your home, the source matters. A roof leak water damage situation demands different repairs than a burst pipe. Understanding the difference helps you respond faster and protects your property from spreading damage.
This guide walks you through how to identify each problem, what happens next, and when to call a professional.
How to Identify the Source of a Water Leak in Your Home
Finding where water enters your home is the first step. A systematic approach combining location, timing, water appearance, and diagnostic tests narrows down the source reliably.
Step 1: Check the timing and weather connection
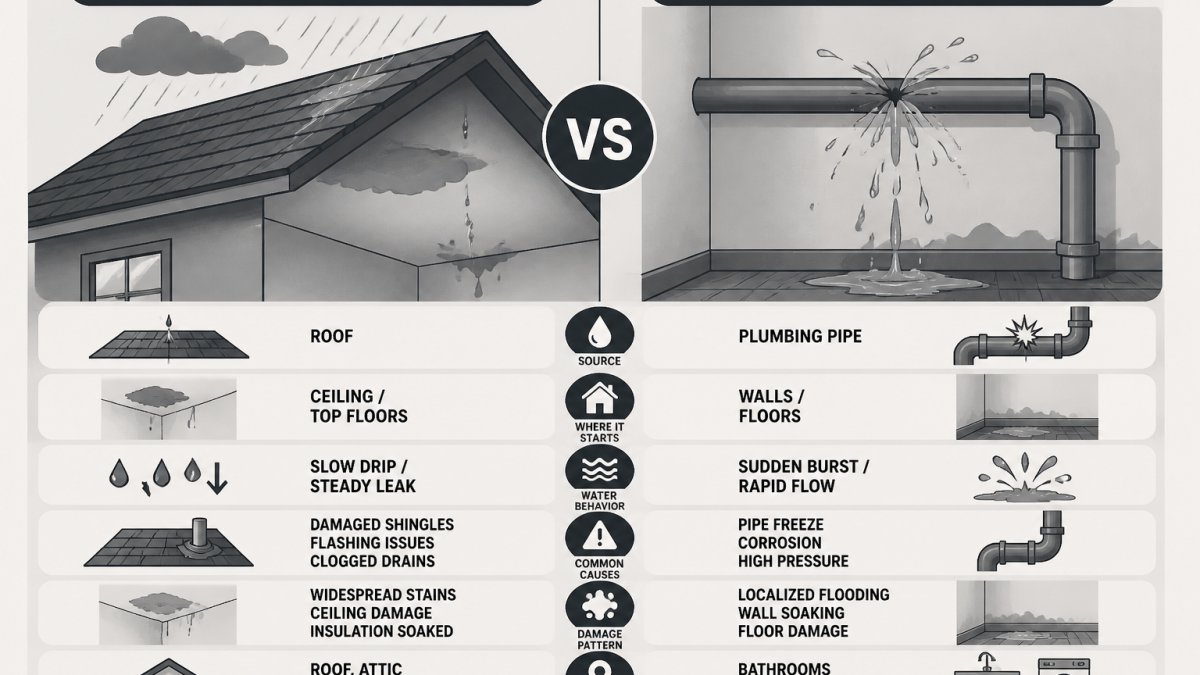
Roof leak indicators: Water appears during or within hours of rain and stops when rain stops. Pipe leak indicators: Water appears on dry days or correlates with water use (showers, laundry, dishwasher). If water only appears during rain, roof damage is likely; if it appears on dry days, suspect plumbing.
Step 2: Locate the wet area and trace upward
For roof leaks, look upward: Start at the wet spot and check the attic or crawlspace above. Look for water stains on roof decking, rafters, or insulation. Roof damage typically appears in upper areas first. For pipe leaks, check horizontally and below: Look under sinks, near appliances, or in basement ceilings directly below the wet area. Inspect visible pipes for corrosion, cracks, or moisture.
Step 3: Check your water meter for hidden leaks
How to run a water-meter test: Locate your water meter, turn off all water-using fixtures, note the reading, wait 30 minutes, and check again. Results: If the meter moved, you have an active pipe leak. If unchanged, roof damage is more likely. Water meters detect movement through the main line; roof leaks do not affect the meter.
Step 4: Inspect visible pipes and connections
Check for these pipe-failure indicators: Corrosion or discoloration (green, white, or rust buildup), pinhole leaks, cracks, loose connections, soft drywall, or hissing sounds. If you see corrosion or cracks, shut off water at the main valve immediately and call a licensed plumber.
Step 5: Examine water appearance and smell
Roof water is clear or tan, may contain leaves or debris, and dries without residue. Pipe water may be cloudy or rust-colored, smells of rust or minerals, and leaves deposits as it dries. Roof water is clean; pipe water carries minerals signaling corrosion.
Visual clues that point to roof damage
Roof leak signs: Dark stains on ceiling drywall or insulation, water dripping during rain, wet spots in the attic, discolored areas near exterior walls on upper floors, mold smell in attic spaces, or visible damage to shingles and flashing.
Signs of interior plumbing failure
Pipe burst signs: Water pooling under sinks or appliances, soft flooring, water spots on basement ceilings, hissing sounds, pressure drops, visible corrosion, or warped drywall. Burst pipes cause rapid release; pinhole leaks create slow seepage. Both require immediate attention to prevent structural damage and mold growth.
Common Causes of Roof Leaks
Common roof leak causes: Damaged or missing shingles, flashing failure, ice dams, poor ventilation, and clogged gutters. Times Square Remodeling Inc. recommends annual roof inspections to catch problems early and prevent major water intrusion.
Common Causes of Pipe Leaks and Bursts
Common pipe failure causes: Frozen pipes, corrosion, high water pressure, tree root intrusion, poor installation, and age (pipes typically last 50-70 years). Burst pipes demand immediate response, shut off water at the main valve and call a licensed plumber.
What to Do After a Burst Pipe or Roof Leak
Immediate steps: Locate the water source. For burst pipes, shut off water at the main valve; for roof leaks, move contents and place buckets. Contain the water with towels or tarps. Turn off power if water reaches outlets. Document damage with photos. Call a licensed roofer or plumber. Do not delay, mold begins growing within 24-48 hours.
Water Damage Cleanup and Drying Time
Once the leak stops, drying becomes critical. Moisture trapped in walls, insulation, or flooring creates mold and structural rot. The drying process differs significantly between roof and pipe damage, and professional oversight ensures hidden moisture is eliminated.
Drying timelines by damage extent
Drying speed depends on the volume of water, materials affected, and environmental conditions.
Surface water (wet floors, initial saturation):
- Timeline: 24-48 hours with active drying
- Method: Fans, dehumidifiers, and open windows to promote air circulation
- Moisture target: Below 50% relative humidity
Damp walls and insulation (water absorbed into materials):
- Timeline: 3-7 days with professional equipment
- Method: Industrial dehumidifiers, air movers, and targeted heat
- Moisture target: Below 17% moisture content in wood; below 12% in drywall
Deep structural moisture (water in framing, under flooring, or in cavities):
- Timeline: 1-2 weeks or longer in severe cases
- Method: Moisture mapping, cavity drying, and continuous monitoring
- Moisture target: Return to baseline moisture levels (typically 8-12% in wood)
Delays in drying increase mold risk exponentially. Mold begins germinating within 24-48 hours of moisture exposure. After 72 hours, visible mold colonies often establish.
Professional water damage remediation process
Professional restoration involves systematic extraction, drying, and prevention steps that DIY methods cannot replicate.
Phase 1: Water extraction and removal
- Industrial-grade pumps and wet vacuums remove standing water
- Saturated materials (drywall, insulation, carpet) are removed to prevent hidden moisture
- Dehumidifiers and air movers are positioned to maximize air circulation
Phase 2: Drying and monitoring
- Moisture meters measure water content in wood, drywall, and other materials
- Equipment runs continuously until moisture levels stabilize
- Daily or twice-daily readings confirm progress
- Drying is complete when readings remain stable for 24 hours
Phase 3: Mold prevention and treatment
- Antimicrobial treatments applied to surfaces and cavities
- HEPA air filtration removes mold spores from the air
- Dehumidification continues to prevent mold germination
Phase 4: Reconstruction and restoration
- Damaged drywall, insulation, and flooring are replaced
- Framing is inspected for rot or structural compromise
- Finishes (paint, trim, fixtures) are restored
Roof leak vs. pipe burst drying differences
The source of water affects drying strategy and timeline.
Roof leak drying:
- Water is clean and typically affects upper areas (attic, upper walls, ceilings)
- Attic ventilation can accelerate drying if weather permits
- Insulation often must be replaced because it absorbs and retains moisture
- Drying may be faster if roof is repaired quickly to prevent ongoing intrusion
Pipe burst drying:
- Water may contain minerals or sediment that complicate drying
- Damage often affects lower areas and wall cavities where air circulation is limited
- Drying hidden moisture in walls requires opening cavities or using specialized equipment
- Drying may take longer because water is trapped in confined spaces
Hidden moisture inspection and verification
Moisture hidden in walls or under flooring is the primary cause of long-term damage and mold. Professional inspection confirms complete drying before reconstruction.
Moisture detection methods:
- Moisture meters: Handheld devices measure water content in wood and drywall (readings below 17% indicate safe levels)
- Thermal imaging: Infrared cameras detect temperature differences that indicate moisture in walls
- Humidity monitoring: Continuous sensors track relative humidity; levels above 60% support mold growth
- Visual inspection: Opening walls or cavities to inspect framing for discoloration, soft spots, or mold
When to open walls:
- If water was present for more than 48 hours
- If drying equipment has run for 7+ days without reaching target moisture levels
- If mold smell persists after drying
- If structural damage is suspected
Opening walls allows direct inspection and targeted drying of cavities. This step prevents the costly surprise of hidden mold or rot discovered months later.
Insurance documentation and mitigation records
Insurance companies require evidence of the damage and proof that you took steps to prevent further loss. Documentation directly affects claim approval and reimbursement.
Photos and video evidence:
- Photograph all wet areas, stains, and visible damage before cleanup begins
- Document the water source (visible roof damage, burst pipe, etc.)
- Record water depth, affected materials, and spread pattern
- Take photos during drying to show equipment in place and progress
Maintenance and repair records:
- Roof inspection reports (if recent) prove you maintained the roof
- Plumbing inspection records or pipe replacement documentation
- Receipts for gutter cleaning, roof repairs, or plumbing maintenance
- These records support your claim and may reduce your deductible
Mitigation and restoration receipts:
- Invoices from water extraction and drying companies
- Equipment rental receipts (dehumidifiers, fans, pumps)
- Material replacement costs (drywall, insulation, flooring)
- Contractor invoices for repairs
Communication with your insurance company:
- Report the loss promptly (most policies require notification within 30 days)
- Provide photos and documentation before cleanup when possible
- Keep a detailed timeline of events, discovery, and response
- Save all correspondence with adjusters and contractors
- Request an adjuster visit before major reconstruction begins
Insurance coverage varies by policy. Roof leaks are typically covered under homeowners insurance if caused by sudden, accidental damage (storm, fallen tree). Pipe bursts are usually covered if the pipe froze or failed suddenly.
Damage Patterns: Where Water Damage Appears
Roof leaks and pipe bursts create different damage patterns. Location tells you what happened.
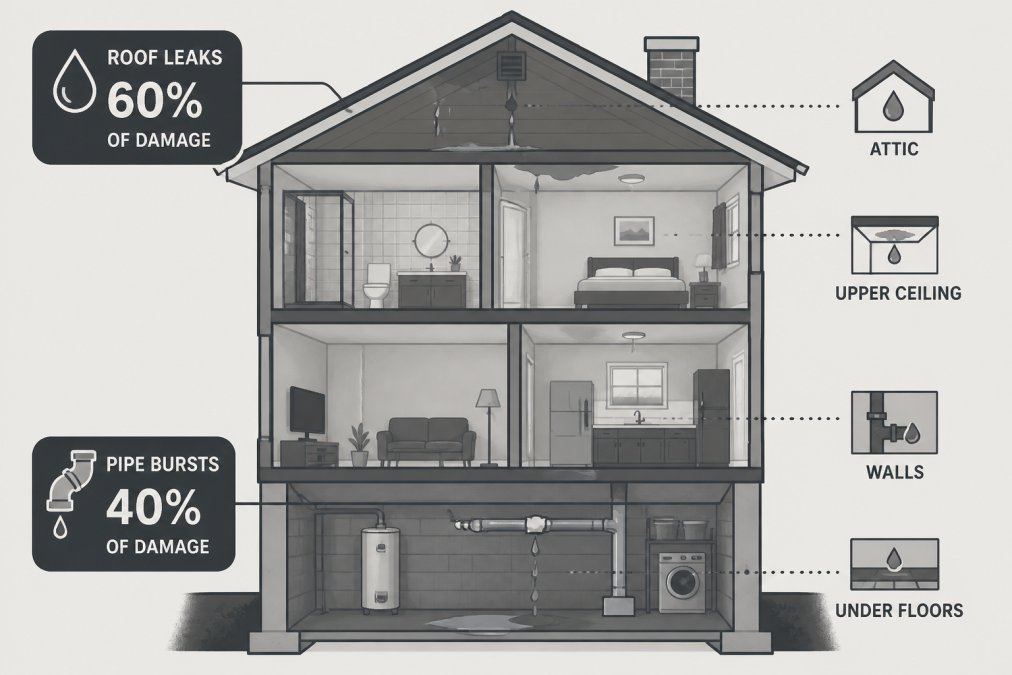
Roof leak damage typically appears in:
- Attic insulation and framing
- Upper ceiling drywall
- Upper wall cavities
- Exterior wall siding near rooflines
Pipe burst damage typically appears in:
- Basement or crawlspace ceilings
- Lower wall cavities
- Under kitchen and bathroom cabinets
- Flooring around fixtures
Roof damage spreads downward through layers. Pipe damage spreads horizontally through walls and under floors. The water category also differs. Roof water is clean. Pipe water may contain minerals or sediment depending on your plumbing system.
How Quickly Water Damage Spreads
Water moves fast. Understanding spread rates helps you prioritize response.
Structural damage timeline:
- First 24 hours, Water soaks into drywall, insulation, and wood. Mold spores begin germinating.
- Days 2-3, Drywall softens. Wood swelling starts. Mold colonies establish.
- Week 1, Structural wood weakens. Mold spreads visibly. Paint and finishes fail.
- Week 2+, Rot sets in. Framing integrity compromises. Repair costs multiply.
Fast action saves money and prevents serious structural problems. Every hour counts when water is active.
Water damage from a roof leak or burst pipe requires different repair approaches, but both demand immediate professional attention. Times Square Remodeling Inc. provides urgent restoration services after fire, flood, or mold damage.
Frequently Asked Questions
How do you tell if water damage is from a roof leak or a burst pipe?
Roof leaks typically appear in upper areas like attics, ceilings, and upper walls, especially after heavy rain or storms. Water stains from roof leaks often follow a dripping pattern downward. Burst pipe damage usually occurs near plumbing lines, under sinks, behind walls, or in basements and crawl spaces. If water appears suddenly without rain, a burst pipe is more likely. Check for visible water intrusion at the highest wet point, this indicates the leak source location.
What should you do first after discovering a burst pipe?
Immediately shut off the main water supply to stop water flow and prevent further damage. Then turn off electrical power to affected areas if water has reached outlets or appliances. Open windows and doors to increase air circulation, and use towels or containers to contain the drip and prevent water from spreading to other areas. Call a licensed plumber and a water damage restoration professional. Document the damage with photos for insurance purposes before cleanup begins.
How quickly can a roof leak cause water damage?
Water damage from roof leaks can begin within hours of water intrusion, especially if the leak goes unnoticed. Moisture spreads through insulation, drywall, and structural materials, weakening them over time. Within 24-48 hours, mold and mildew can begin growing in damp areas. Structural damage and material deterioration accelerate the longer a leak persists. Prompt repair of roof leaks is essential to prevent long-term damage to ceilings, walls, attic framing, and insulation.
Can a small pipe leak cause serious water damage?
Yes. Even small plumbing leaks can cause significant damage over time. A pinhole leak or slow drip may go unnoticed for weeks or months, allowing water to accumulate behind walls, under floors, and in insulation. This hidden moisture creates ideal conditions for mold growth and structural weakening. Water pressure in supply lines can accelerate damage from small leaks. Regular moisture detection and prompt repair of even minor leaks prevent costly long-term water damage and health hazards from mold.