 how-to
How to Identify Mold Growth in Walls: 2026 Guide
Table of Contents
- Visual Signs of Mold Growth in Walls
- Signs of Mold Behind Drywall You Should Not Ignore
- Musty Odors and Other Sensory Clues
- Mold Inspection Tools for Homeowners
- Mold vs. Soot vs. Dirt: How to Tell the Difference
- Preventing Mold Growth After Water Damage
- When to Call a Professional for Mold Inspection
- Frequently Asked Questions
Last Updated: October 4, 2026
Visual Signs of Mold Growth in Walls
Identifying mold growth in walls starts with your eyes. This guide from Times Square Remodeling Inc. covers the visual, sensory, and tool-based signals we check on restoration calls across Los Angeles County.
Mold growth in walls is the spread of fungal colonies across drywall, insulation, or framing that have stayed damp long enough for spores to settle and multiply. It usually begins in a hidden wall cavity and only becomes visible once it reaches the surface, so surface staining is often the last sign you see, not the first.
Water is the trigger. Without sustained dampness, mold spores cannot colonize a surface.
Discoloration and Surface Staining
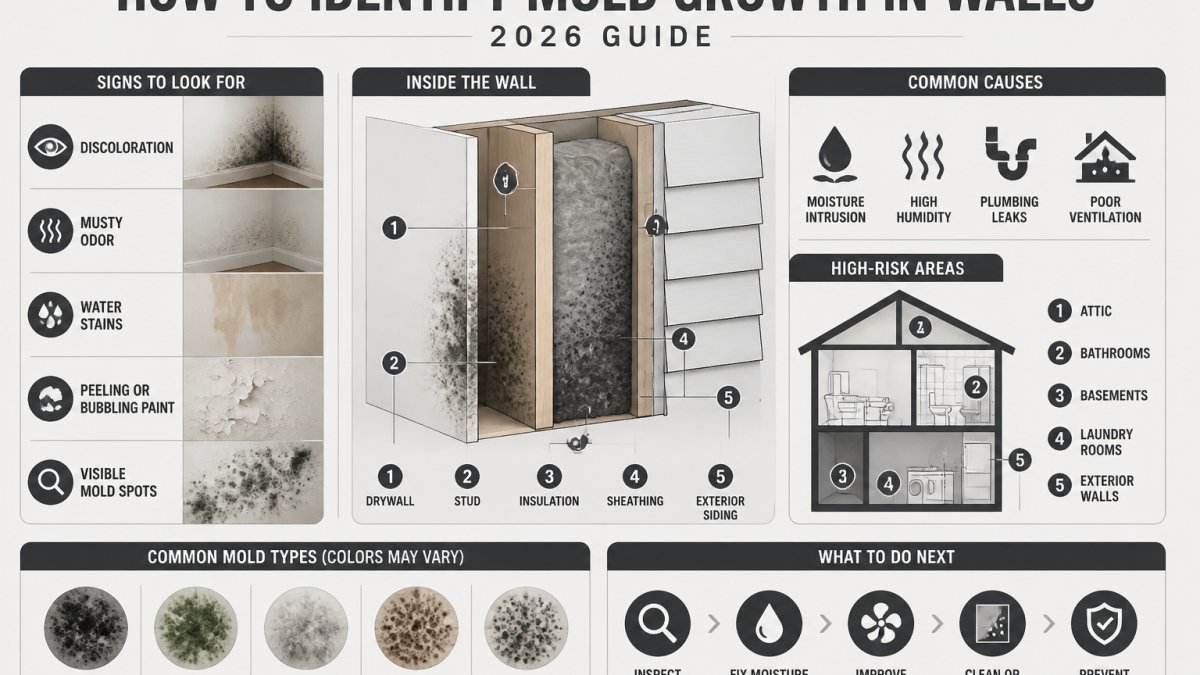
Staining is the most common visual clue: brown, gray-green, or black patches with soft edges rather than sharp lines.
Mold staining spreads outward in irregular circles; a one-time leak leaves a ring or tide line. If the patch keeps growing, moisture is still feeding it.
Check these spots first:
- Ceiling corners below bathrooms
- Baseboards behind furniture
- Wall sections under windows
Discoloration that fades after cleaning and returns within weeks means the colony is still alive inside the wall.
Texture Changes: Fuzzy, Leathery, or Velvet-Like Patches
Texture separates mold from a simple stain. Colonies often feel fuzzy, leathery, or velvet-like.
Early growth looks like fine dust, then develops a raised, fuzzy texture. Some species form flat, leathery patches resembling dried skin.
Do not touch suspected mold with bare hands. Disturbing a colony releases airborne spores into the room.
Texture varies by wall material: on painted drywall, mold sits on the surface, while on bare wood framing it soaks in and looks like a dark stain with a rough feel.
Peeling Paint, Bubbling Wallpaper, and Warped Drywall
Paint and wallpaper fail before drywall does. Bubbling, peeling, or lifting warns that moisture is trapped behind the surface.
Here is what each sign points to:
- Bubbling paint: water vapor pushing from behind the coating
- Peeling wallpaper: adhesive breaking down from dampness
- Warped drywall: the gypsum core has absorbed water and swelled
Warped drywall is serious: once the board swells, it loses structural integrity and needs replacement, not cleaning.
Signs of Mold Behind Drywall You Should Not Ignore
The signs of mold behind drywall show up as a cluster of small clues rather than one obvious patch.
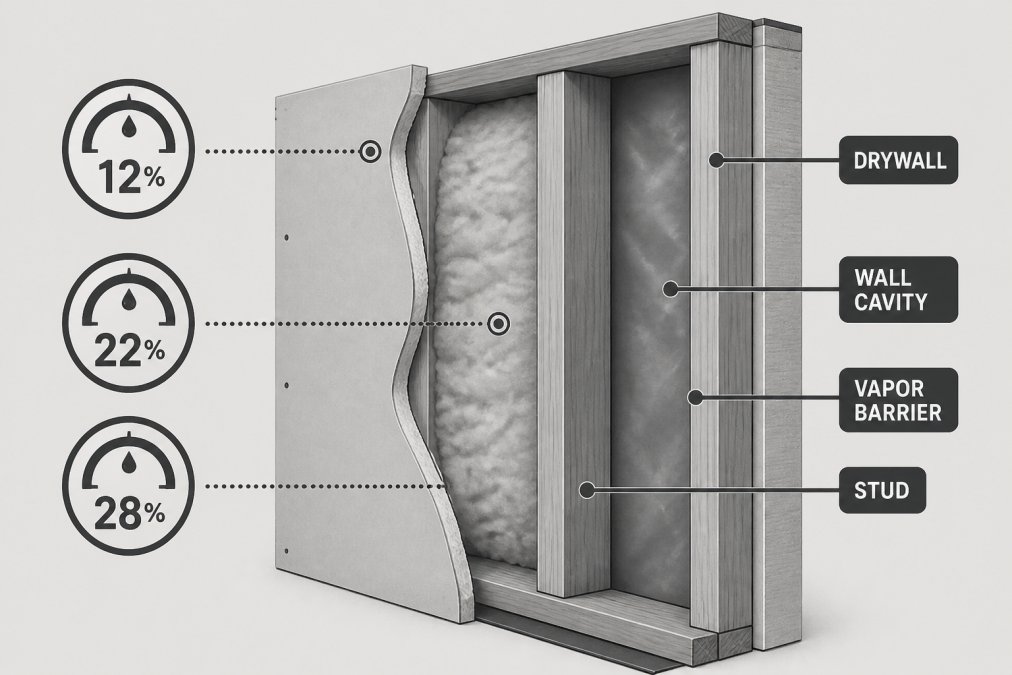
Watch for these combinations:
- A musty odor that gets stronger near one wall
- Condensation on interior windows or cold pipes
- Repeated paint failure in the same spot
Any two of these together justify a closer look. A single clue might be nothing. A pattern rarely is.
Wall cavities are the usual hiding place. Mold grows on the back of drywall, on insulation, and on the paper facing, all out of sight until conditions worsen.
Musty Odors and Other Sensory Clues
Your nose often detects mold before your eyes do.
The smell comes from microbial volatile compounds released as mold digests organic material, strongest in closed rooms near the affected wall.
Try this test: close the door and windows for an hour, then walk in and breathe near the suspect wall.
Other sensory clues include:
- A damp, heavy feeling in one room
- Visible condensation on walls or windows
- A metallic taste in the air in severe cases
If the odor fades after ventilation but returns within a day, the source is still active.
Mold Inspection Tools for Homeowners
You do not need a lab or a contractor's kit to gather useful evidence. The EPA guide to mold, moisture, and your home makes the same point in plain terms: fix the water problem first, because mold cannot grow without it.
Three tools cover most homeowner situations:
- Pin-type moisture meter, drives two small pins into the surface and measures electrical resistance between them. Wet materials conduct better than dry ones. Best for drywall, wood, and plaster.
- Pinless (capacitive) moisture meter, presses flat against the wall and reads moisture through the surface without leaving holes. Useful for finished walls you do not want to puncture, but it reads shallower and can be fooled by metal studs or foil-backed materials.
- Smartphone thermal camera attachment, shows surface temperature differences. Damp areas evaporate and cool, so they show up as cold patches. It does not measure moisture directly.
A moisture meter is a handheld device that measures water content in building materials by sending a small electrical current through the surface. The useful part is knowing what the numbers mean on the material in front of you.
DIY Moisture Meter Usage
Using a moisture meter correctly takes about five minutes per wall:
- Press the meter's pins firmly against the wall surface, perpendicular to the wall
- Read the moisture percentage on the display and hold it steady for a few seconds
- If the reading is above 15%, investigate further
- If it is below 15%, monitor the area or check other spots
- Document each reading with a photo and a location note
Take readings at roughly 6, 24, and 48 inches off the floor. Moisture pools low near the baseboard and climbs upward, so a high reading near the floor tells a different story than one near the ceiling.
The same number means different things on different materials:
| Material | Typical dry reading | Reading worth investigating |
|---|---|---|
| Painted drywall | 8-12% | Above 15% |
| Bare gypsum core (exposed) | 10-14% | Above 17% |
| Wood framing / studs | 8-14% | Above 17-19% |
| Plaster | 6-10% | Above 13% |
| Concrete or masonry | 10-15% | Above 17% |
These are general ranges, not lab thresholds. A 15% reading on drywall is a warning; the same number on solid wood framing is closer to normal.
A few practical cautions:
- Metal studs, foil-backed insulation, and copper plumbing can throw off pinless meters. Switch to a pin-type meter or move a few inches away.
- Fresh paint, wallpaper paste, and recently cleaned surfaces can read artificially high for a day or two.
- Pins leave small holes. On a finished wall, group your test points in an area you plan to repair anyway, or use a pinless meter first and confirm with pins only where the pinless reading was high.
Thermal Imaging for Homeowners
Thermal imaging cameras show temperature differences across a wall. Damp areas stay cooler because evaporating water pulls heat away, no moisture is measured, only temperature.
Affordable smartphone attachments make this tool accessible.
A few things that matter for accuracy:
- Scan when the temperature difference is largest. Early morning or after the heat has been running is better than mid-afternoon when the wall is uniformly warm.
- Move furniture and curtains away first. They block the wall and skew the reading.
- Watch for reflections. Glass, glossy paint, and metal ductwork reflect infrared and can look like false cold spots.
Thermal imaging does not detect mold directly; it finds the moisture that feeds it.
Combine the two tools in this order:
- Walk the room with the thermal camera and mark every cool patch
- Press the moisture meter into the center of each patch
- If the meter reads high, follow the moisture to its highest reading, that is usually the source
- If the meter reads normal, the cold patch is likely insulation or air leakage, not water
That sequence, camera finds the zone, meter confirms the water, is the fastest way to separate a real problem from a false alarm.
Mold vs. Soot vs. Dirt: How to Tell the Difference
Not every dark patch is mold, and treating the wrong problem wastes time and money. Homeowners also confuse mold with efflorescence, rust staining, and surfactant leaching. Here is how all six compare.
| Feature | Mold | Soot | Dirt | Efflorescence | Rust stain | Surfactant leaching |
|---|---|---|---|---|---|---|
| Appearance | Fuzzy or leathery patches | Fine black powder | Dry, even film | White, chalky, crystalline | Orange-brown streaks | Amber or brown drips |
| Smell | Musty, earthy | Burnt, acrid | Neutral | Neutral, slightly mineral | Metallic | Soapy or neutral |
| Texture | Raised, soft | Sooty, smears easily | Gritty, wipes off | Powdery, crumbles | Smooth, stains | Sticky when fresh, glossy when dry |
| Reaction to moisture | Grows and spreads | Unchanged | Unchanged | Dissolves, then returns as wall dries | Darkens, spreads | Re-wets and drips again |
| Common location | Damp walls, corners | Near vents, fireplaces | High-touch areas | Basement walls, concrete | Under pipes, near fasteners | Freshly painted exterior walls |
How to tell them apart in practice:
- Mold grows back after cleaning if moisture remains. It has a musty smell and a raised, fuzzy texture.
- Soot smears when you wipe it and leaves a black streak. It clusters near a combustion source, a fireplace, furnace vent, or candle.
- Dirt wipes off clean and does not return without a new source. No smell, no growth.
A simple field test: dab a small spot with a damp cloth. Mold may wipe away but leaves a stain and returns. Soot streaks. Dirt disappears. Efflorescence dissolves and reappears as the wall dries.
If you are unsure after the wipe test, the moisture meter is the tiebreaker. Mold needs a wet wall. Soot, dirt, and surfactant leaching do not.
Preventing Mold Growth After Water Damage
Speed is everything after a leak or flood. Preventing mold growth after water damage comes down to drying the structure fast and keeping it dry.
The FEMA guidance on dealing with mold and moisture after a disaster stresses removing standing water and drying affected materials within the first day or two.
Follow this sequence:
- Stop the water source immediately
- Remove standing water with a wet vacuum or pump
- Pull up soaked carpet and padding
Ventilation matters too. Open windows when outdoor humidity is low. Run the air conditioner to pull moisture from the air.
Dampness that lingers past 48 hours gives spores time to settle. Once a colony forms, cleaning alone rarely solves it.
When to Call a Professional for Mold Inspection
Bring in a licensed professional when the affected area is larger than a few square feet, the smell persists after drying, or you find warped drywall.
Other reasons to call:
- Mold near HVAC ducts or inside wall cavities
- Recurring growth after repeated cleaning
- Anyone in the home with respiratory symptoms or allergic reactions
Professional inspection uses moisture mapping, thermal imaging, and sometimes air sampling to measure spore count, revealing the scope and whether remediation is needed.
At Times Square Remodeling Inc., we handle mold-damaged drywall, insulation, and framing as part of full restoration work.
Mold in walls rarely fixes itself, and the longer it spreads, the more material it damages.
Frequently Asked Questions
How do you know if mold is growing behind your walls?
Look for musty odors, discoloration, peeling paint, and warped drywall. A moisture meter reading above 15% indicates dampness that supports fungal growth. Thermal imaging can reveal temperature differences from hidden moisture. If you notice respiratory symptoms or allergic reactions that improve when you leave home, hidden mold behind drywall may be the cause.
What kills mold instantly in walls?
No product kills mold instantly in walls. Surface mold on non-porous materials can be removed with a diluted bleach solution or commercial mold cleaner. However, mold growing inside wall cavities or on porous materials like drywall requires removal and replacement of affected materials. Killing surface mold without addressing the underlying moisture problem allows regrowth within days.
Can you smell mold behind walls without seeing it?
Yes. A musty, earthy odor is one of the most reliable indicators of hidden mold. The smell comes from microbial volatile organic compounds released during fungal growth. If you notice this odor in specific rooms or when your HVAC system runs, mold is likely growing in the wall cavity or ductwork. Trust your nose and investigate further with moisture meters or professional inspection.
When should you hire a professional for mold inspection?
Call a professional when you detect musty odors without visible mold, when moisture meter readings stay above 15% after drying, when mold covers more than 10 square feet, or when you experience persistent respiratory symptoms. A licensed contractor can use thermal imaging and moisture mapping to locate hidden mold, assess structural damage, and recommend remediation that protects your indoor air quality.