 how-to
Signs of Water Damage Behind Kitchen Cabinets
Table of Contents
- How to Spot Signs of Water Damage Behind Kitchen Cabinets
- Start With the Under-Sink Cabinet
- Check the Toe Kick and Floor Seam
- Water Damaged Kitchen Cabinets: What Damage Looks Like
- Hidden Water Damage Behind Cabinets: A Room-by-Room Inspection Checklist
- How to Dry Kitchen Cabinets After a Leak
- Signs of Mold Behind Kitchen Cabinets
- Tracing the Leak Source Beyond the Sink
- Repair, Replace, or Call a Professional
- Frequently Asked Questions
Last Updated: October 20, 2026
How to Spot Signs of Water Damage Behind Kitchen Cabinets
Water damage behind kitchen cabinets is a slow, quiet problem. By the time most homeowners notice it, the leak has usually been running for weeks. At Times Square Remodeling Inc., we have spent 15 years opening up kitchens and finding the same hidden messes again and again. This guide shows you exactly where to look and what to do next.
Start with the cabinet under the sink. It is the most common failure point in any kitchen.
Water damage is the physical breakdown of wood, drywall, and flooring caused by prolonged moisture exposure. It rarely announces itself. It spreads behind panels, under toe kicks, and along the wall base plate where you cannot see it.
The good news: most of the early signs are visible if you know where to kneel and what to touch. Below, we walk through each one, step by step.
Start With the Under-Sink Cabinet
Open the doors, pull out everything, and look up. The under-sink cabinet is where most hidden water damage behind cabinets begins.
Check these spots in order:
- Supply lines where they connect to the shutoff valves
- The drain trap and the gasket where it meets the sink
- Pipe cutouts in the cabinet back, where water runs down unseen
- The cabinet floor for standing water or dark rings
A common mistake is checking only the floor. Water runs down the pipes and pools at the back corner, behind the drawer box. Run a dry paper towel along the cabinet base and the wall seam. Any dampness on the towel means moisture is still active.
Check the Toe Kick and Floor Seam
The toe kick, or kickplate, hides the gap between the cabinet base and the floor. It is also where water collects after a slow leak.
Kneel down and shine a flashlight along the seam. Look for:
- Lifted or bubbling caulk
- Dark staining on the floor edge
- Soft spots when you press with a screwdriver handle
- Water-damaged flooring that curls at the cabinet line
If the toe kick feels spongy, the cabinet base has already absorbed water. That is a repair issue, not a cleaning issue.
Water Damaged Kitchen Cabinets: What Damage Looks Like
Water damaged kitchen cabinets show a predictable set of symptoms. Once you know them, they are hard to miss.
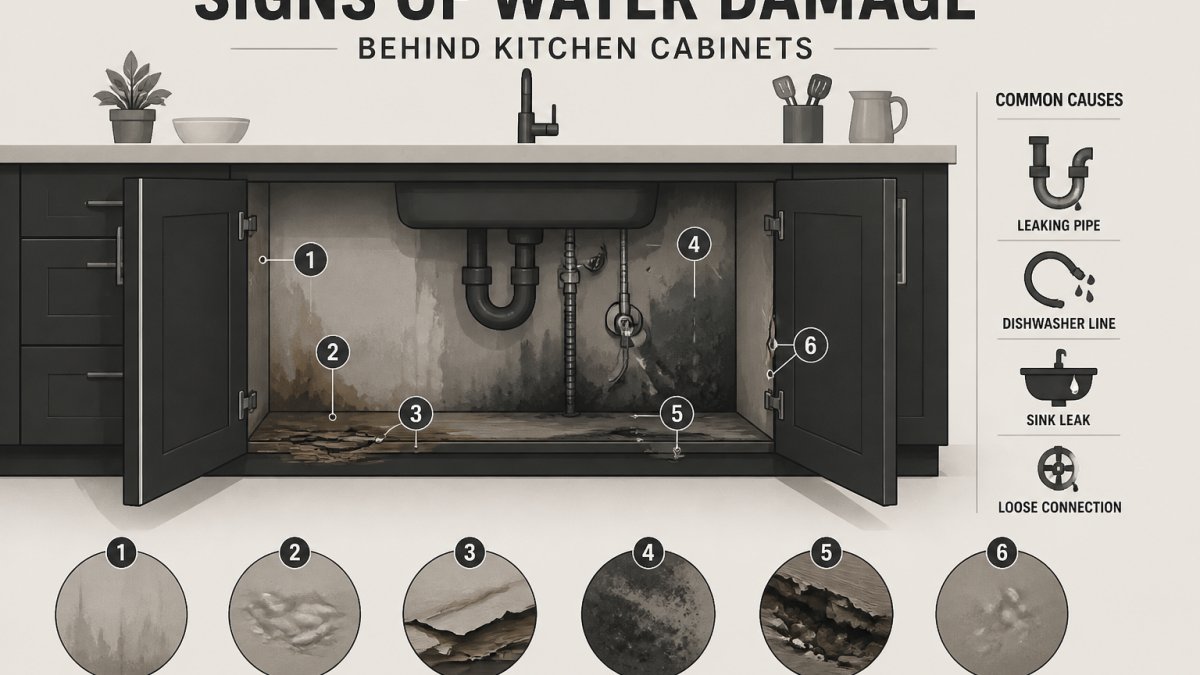
Swelling and soft wood are the clearest signs. Particleboard swells and never returns to its original shape. Press a fingernail into the cabinet base. If it sinks in, the material is compromised.
Bubbled or peeling laminate and veneer happen when moisture gets under the surface. You will see ripples, lifted edges, or flakes coming off the cabinet sides.
Discoloration and water stains appear as dark rings or tide lines on the cabinet floor and sides. Old stains are brown and dry. Fresh stains are darker and slightly damp.
Cabinet doors and hinges may stick, sag, or squeak. Swollen wood pushes the door out of alignment.
Hidden Water Damage Behind Cabinets: A Room-by-Room Inspection Checklist
Hidden water damage behind cabinets hides in a fixed sequence. Work through this checklist in order and do not skip steps. The goal is not just to spot stains, it is to decide, at each stop, whether moisture is active or old.
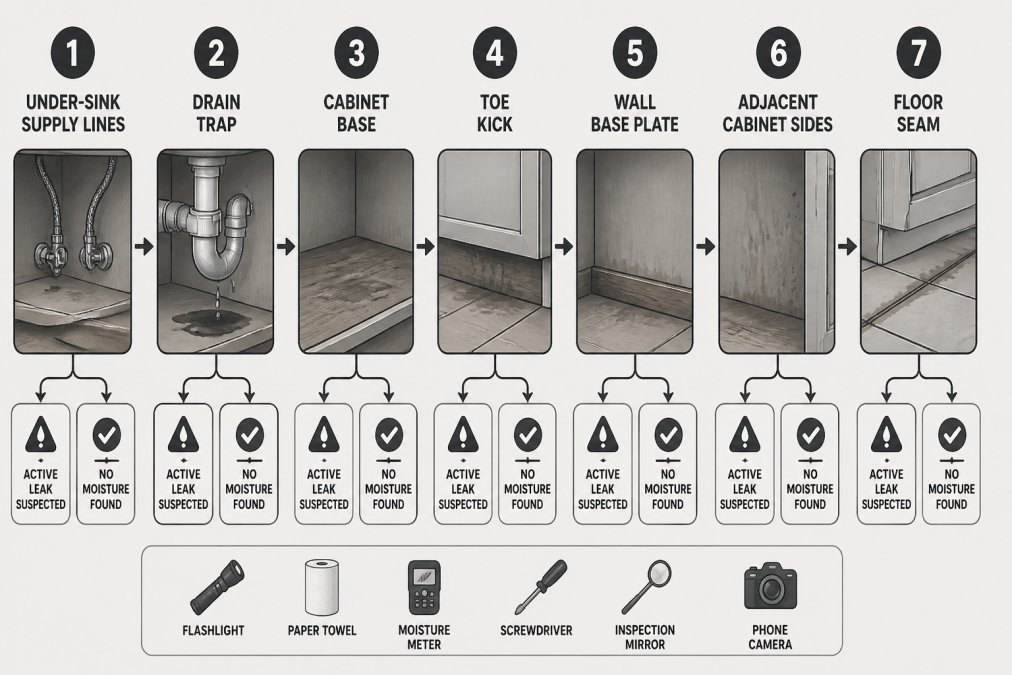
- Drain trap and gasket: run the faucet for two minutes, then run your finger under the trap slip nuts and the sink basket gasket. Any film of water is a live leak.
- Cabinet base: press the screwdriver handle into the base panel at the front, middle, and back. A dull thud and a visible dent mean softened material.
- Toe kick: probe the caulk line and the seam where the toe kick meets the floor. Lifted caulk plus dark staining is a classic slow-leak signature.
- Wall base plate: shine the light where the cabinet back meets the wall. Look for tide lines, bubbling paint, or a chalky efflorescence film.
- Adjacent cabinet sides: water wicks sideways through shared panels. Compare the moisture meter reading on the suspect side against the same spot on a cabinet two doors away.
- Floor seam: check for curling flooring, dark grout, or a soft subfloor when you press near the cabinet line.
Reading the meter. Take a baseline reading on a cabinet panel you know is dry, typically an upper cabinet door face away from the sink.
Accessing concealed areas safely. Do not pry off a cabinet back panel or cut into a wall to chase a stain. If you suspect mold, do not disturb it, see the mold section below.
Run the faucet for two minutes, then repeat the towel test. An active leak shows up fast. Old damage stays dry. If any step flags moisture, stop and trace the source before continuing down the checklist.
How to Dry Kitchen Cabinets After a Leak
Shut off the water first. Then dry the cabinet before you repair anything. Drying is a measurable process, not a waiting game, and the material inside the cabinet determines how long it takes and whether it can be saved.
- Stop the leak. Close the shutoff valves under the sink. If the valve will not close, shut off the main supply.
- Remove cabinet doors and drawers to improve airflow into the cabinet box.
- Blot standing water with towels and discard soaked items, cardboard, paper, and swollen particleboard shelf pins.
- Set a fan in front of the open cabinet. Aim it across the cabinet opening, not directly into the back corner, so air moves through the box.
- Run a dehumidifier in the kitchen and keep windows closed so the unit pulls moisture from the room rather than the outdoors.
- Leave the cabinet open and re-check moisture with your meter each day.
Material matters. Solid wood can usually be dried and refinished if it has not cracked or delaminated. Plywood tolerates short-term moisture but delaminates at the edges once water reaches the glue lines. Particleboard and MDF are the least forgiving: once they swell, they do not return to their original thickness, and the swollen edge holds moisture long after the surface feels dry.
When is it actually dry? Surface feel is unreliable. Use the same moisture meter and the same baseline you established during inspection. A cabinet is dry enough to seal or paint when repeated readings over two to three days hold steady near the baseline and stop falling.
When drying has failed. Stop drying and move to repair or replacement if any of these are true:
- Moisture readings stay elevated after several days of fan and dehumidifier use.
- The cabinet base or toe kick remains soft when pressed.
- A musty odor returns after the cabinet has been closed overnight.
- You find mold on the cabinet back or the wall behind it.
Do not seal or paint a damp cabinet. Trapped moisture causes mold within days, and paint over a damp surface will blister and peel. If the leak came from a supply line or appliance connection, confirm the repair holds before you restart the drying clock, otherwise you are drying a cabinet that is still getting wet.
Signs of Mold Behind Kitchen Cabinets
Signs of mold behind kitchen cabinets include a musty odor, dark speckling on the cabinet back, and a chalky white film on the wood. Mold needs moisture, so it follows water damage closely.
Check the cabinet back panel and the wall behind it. Look for:
- Black or green speckles in corners
- White powder on framing
- Peeling paint on the wall behind the cabinet
- A smell that gets stronger when you open the doors
Anyone with allergies or breathing issues should not disturb visible mold. Have it assessed before you start cleaning.
Tracing the Leak Source Beyond the Sink
The sink is not always the culprit. Water intrusion can come from several places.
Check the dishwasher supply line, the refrigerator ice maker line, and the roof or wall above the kitchen. A roof leak travels down inside the wall and shows up at the cabinet top, not the base.
Distinguish an active leak from old damage with a simple test. Dry the area completely, wait 24 hours, and check again. New moisture means the leak is still running.
Repair, Replace, or Call a Professional
Surface stains and minor swelling can often be repaired. Soft, crumbled cabinet bases and mold behind the back panel usually mean replacement.
Call a licensed contractor when you find:
- Soft or crumbling cabinet bases
- Mold covering more than a small patch
- Water damage that reaches the wall or floor structure
- A leak you cannot trace
Times Square Remodeling Inc. is a California-licensed general contractor (License #953868) with 15 years of experience in kitchen remodeling and water damage restoration. We inspect the full cabinet run, document the damage, and handle repair or replacement end to end.
Frequently Asked Questions
What are the first signs of water damage behind kitchen cabinets?
Early signs include a musty odor when you open cabinet doors, dark water stains on the cabinet base or back panel, and wood that feels soft or swollen near the sink plumbing. You may also see bubbling laminate, peeling veneer, or discoloration around pipe cutouts. Check the toe kick and the floor seam for standing water or warped flooring. Catching these signs of water damage early lets you dry the area and repair it before mold takes hold.
How can I tell if a leak is active or old water damage?
Press a dry paper towel against the suspect area and check it after a few hours. If the towel comes back damp, the leak is likely active. Look for fresh drips under supply lines, a water stain that grows over a week, or a musty smell that gets stronger. Old damage usually appears as a dry, dark ring with no moisture. A moisture meter reading above the surrounding dry wood confirms an active problem worth tracing.
Can water damage behind cabinets cause mold?
Yes. Mold needs moisture and organic material, and particleboard cabinet bases supply both. Signs of mold behind kitchen cabinets include black or green speckling on the back panel, a persistent musty odor, and visible fuzz near pipe cutouts. Address the leak source first, then dry the cavity thoroughly. If mold covers more than a small patch or you feel burning eyes or congestion at home, have a professional assess the area before you reinstall cabinet doors.
Should I remove kitchen cabinets to check for water damage?
You rarely need to remove full cabinets to inspect. Start by emptying the under-sink cabinet, removing the cabinet baseboard, and shining a light along the back panel and wall base plate. Pull out the drawer boxes and look at the cabinet sides. If you find soft wood, a swollen base, or a moisture meter reading that stays high after drying, a contractor may need to detach that cabinet section to reach the wall and flooring.
Water damage behind kitchen cabinets rarely fixes itself. The longer moisture sits, the more cabinet base, flooring, and drywall you lose. If your inspection turns up soft wood, mold, or a leak you cannot trace, get a professional assessment before the damage spreads. Times Square Remodeling Inc. brings licensed expertise, full-service project management, and 15 years of remodeling experience to every kitchen we open up. Contact us to schedule an inspection and protect your home.