 how-to
How to Install Solar Panels on Flat Roofs: 2026 Guide
Table of Contents
- Before You Start: Flat Roof Solar Panel Prerequisites
- Step 1: Map Your Roof and Plan the Array Layout
- Step 2: Choose Flat Roof Solar Panel Mounting Systems
- Step 3: Set the Tilt Angle for Flat Roof Solar Panels
- Step 4: Verify Flat Roof Solar Panel Roof Load Requirements
- Step 5: Handle Solar Panel Installation Permits and Inspections
- Step 6: Mount, Wire, and Commission the System
- Frequently Asked Questions
Last Updated: October 17, 2026
Before You Start: Flat Roof Solar Panel Prerequisites
Learning how to install solar panels on flat roofs starts with one honest question: is your roof ready? A flat roof can host a clean, low-profile solar array.
Flat roof solar mounting is the practice of securing a photovoltaic array to a low-slope roof using ballasted, penetrating, or hybrid racking.
Here is the short version of what decides success:
- Roof age and remaining service life
- Membrane type and condition
- Framing capacity under the array
- Local permit and inspection path
Get those four right, and the install goes smoothly. Skip them, and you will pay twice.
Roof Condition and Age Check
Start with the roof itself. If the membrane is near the end of its life, replace it before the panels go on. Lifting an array later to re-roof costs far more than doing both jobs in one pass.
Check for ponding water, blisters, seam failures, and soft spots underfoot. Any of these means repair work comes first. A roof with active leaks is not a solar candidate yet.
Tools, Materials, and Safety Gear
A flat roof job needs the right kit before anyone climbs up:
- Fall protection harness and roof anchors
- Non-penetrating seam probe and moisture meter
- Tape measure, chalk line, and layout markers
- Torque wrench for racking hardware
- Caulk gun and membrane-compatible sealant
- Cordless drill with manufacturer-approved bits
- MC4 crimping tool and wire strippers
- Multimeter for voltage checks
- Safety glasses, gloves, and non-slip boots
Buy sealant that matches your membrane. Asphalt-compatible products can damage TPO and PVC. This is a common and expensive mistake.
Step 1: Map Your Roof and Plan the Array Layout
Measure the usable area first, then subtract for setbacks, drainage paths, and roof access. Keep water flowing toward existing drains. A solar array should never create a dam.
Sketch the roof to scale. Mark every penetration, vent, skylight, and HVAC unit. Then block out the array footprint in rows.
- Leave clear access lanes for service and firefighting
- Keep panels out of shaded zones from parapets and equipment
- Group rows to shorten wire runs
- Note the compass direction of each roof face
South-facing space produces the most. A U.S. Department of Energy guide to solar photovoltaic technology explains how orientation and tilt affect production.
Step 2: Choose Flat Roof Solar Panel Mounting Systems
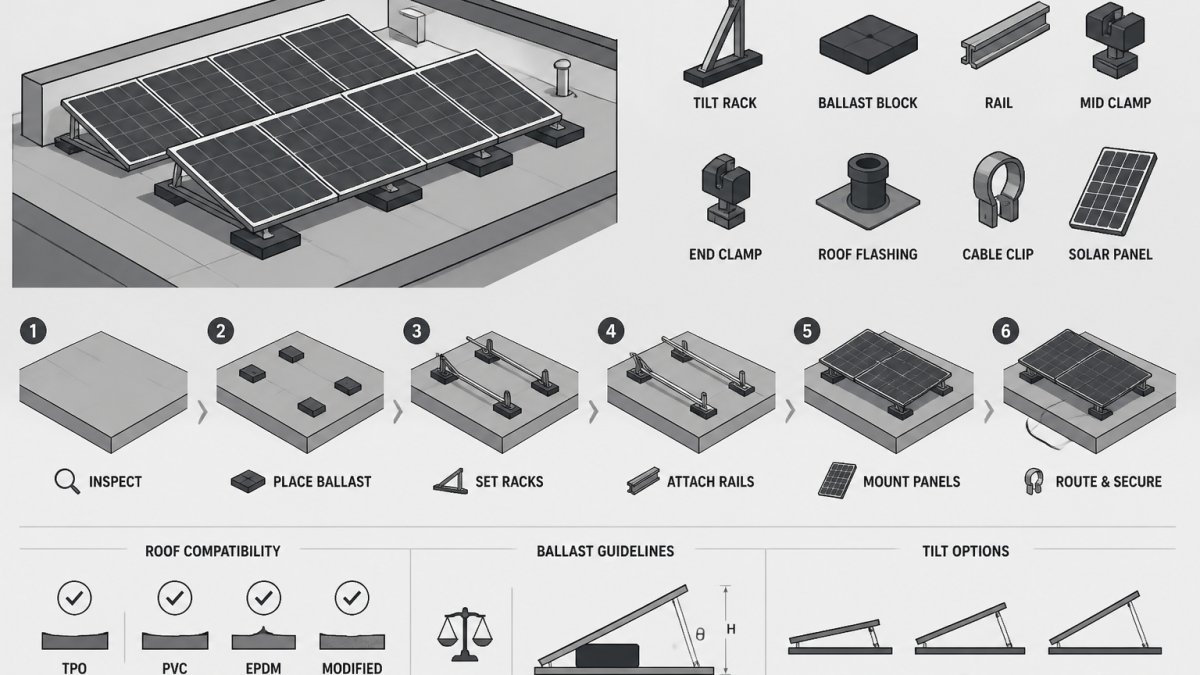
Flat roof solar panel mounting systems fall into three families: ballasted, penetrating, and hybrid.
Ballasted racks hold panels down with weighted blocks. They avoid roof holes, which protects the warranty on many membranes. The tradeoff is weight.
Penetrating racks bolt through the roof into framing. They use far less weight and handle high wind well.
Hybrid racks combine both methods. They suit roofs where pure ballast is too heavy but full penetration is undesirable.
Ballasted vs. Penetrating Racks
| Feature | Ballasted Racks | Penetrating Racks |
|---|---|---|
| Roof penetrations | None | Yes, into framing |
| Added weight | High | Low |
| Wind uplift resistance | Good with correct ballast | Strong |
| Membrane warranty risk | Low | Depends on flashing quality |
| Best for | Strong decks, membrane roofs | Weight-limited or high-wind roofs |
| Removal for re-roofing | Simple | More labor |
Our rule of thumb: if the framing can carry the ballast, go ballasted. If not, penetrate and flash it properly.
Step 3: Set the Tilt Angle for Flat Roof Solar Panels
The best tilt angle for flat roof solar panels is usually between 10 and 15 degrees in most U.S. climates.
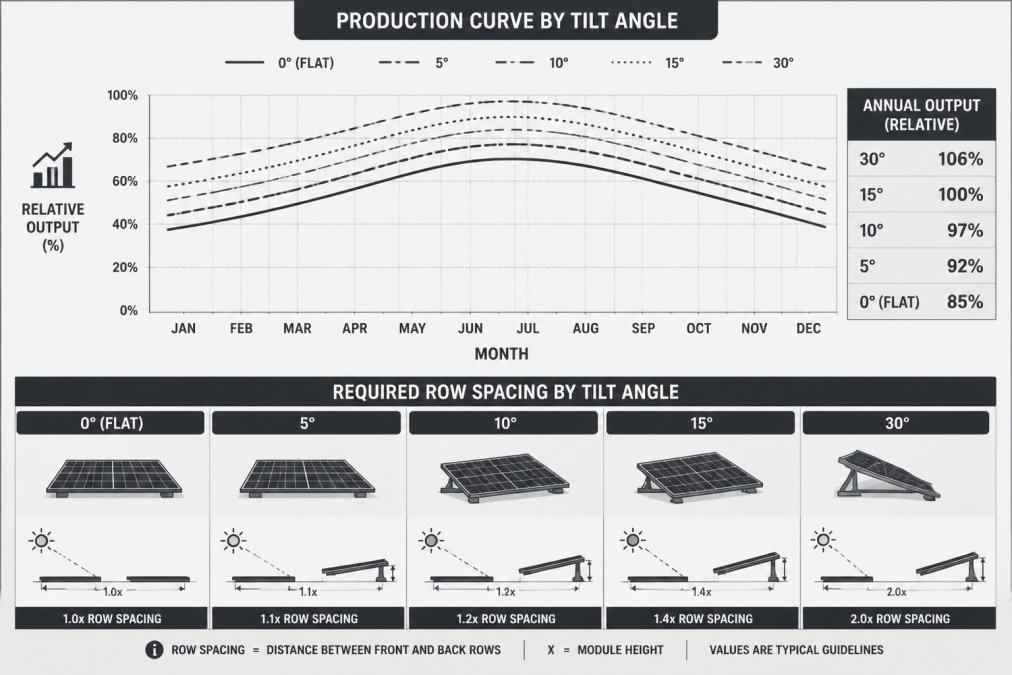
Tilt is a tradeoff. Steeper angles capture more low winter sun but force wider row spacing to avoid shading.
Use your latitude as a starting point, then adjust for row spacing. A tilt of 10 to 15 degrees is a practical default for most residential flat roofs.
Step 4: Verify Flat Roof Solar Panel Roof Load Requirements
Flat roof solar panel roof load requirements come down to two forces that pull in opposite directions: dead load pushing down and wind uplift pulling up. Get either one wrong and the array is either overbuilt or unsafe. Most residential flat roofs can carry a solar array, but "most" is not "yours" until the framing is checked.
Dead Load: What the Array Actually Weighs
Dead load is the static weight of racking, ballast, and panels. The panel and rack portion is fairly predictable. The ballast is the wild card.
- Panels and racking: a typical module weighs roughly 40-50 pounds, and racking adds a few pounds per panel. A 20-panel array lands in the 1,000-1,400 pound range before ballast.
- Ballast: weighted blocks or trays are sized by the rack manufacturer's engineering report for your wind zone. On a high-wind site, ballast can easily exceed the weight of the panels themselves.
- Concentrated loads: ballast sits on rack feet, not spread evenly. A single foot can carry several hundred pounds, so the deck must handle point loads, not just average weight per square foot.
Add the array dead load to the roof's existing dead load (membrane, insulation, HVAC, prior ballast) before comparing to the framing's capacity. A roof that was fine empty can be marginal once a ballasted array lands on it.
Wind Uplift: The Force Homeowners Underestimate
Wind moving over a flat roof creates negative pressure that tries to lift the array. Uplift is highest at roof edges, corners, and parapets, which is why ballast layouts are heavier there. The rack manufacturer's engineering report ties ballast weight to the building's wind exposure category and the roof zone. Do not substitute a generic ballast count from a different project.
How to Check the Framing
A structural check follows a repeatable path:
- Identify the framing. Note joist or rafter size, spacing, span, and species. Older decks and long spans are the usual problem cases.
- Confirm the deck. Panel sheathing or structural concrete must transfer point loads to framing without crushing or deflection.
- Run the numbers. Compare combined dead load plus uplift demand against the framing's capacity with an appropriate safety factor.
- Flag the weak zones. Edges, corners, and any unsupported spans need attention before ballast goes down.
If the numbers are close, bring in a structural engineer. The cost of a stamped letter is small next to lifting an array off a sagging roof.
Ballast vs. Penetration When Load Is Tight
When the framing cannot carry full ballast, the answer is usually a hybrid or penetrating rack. Penetrating racks transfer load into framing through flashed feet and use far less weight, which is why they show up on weight-limited and high-wind roofs. The tradeoff is roof holes and the flashing quality that comes with them.
Step 5: Handle Solar Panel Installation Permits and Inspections
Solar panel installation permits and inspections follow a predictable path, but the details decide whether the project moves or stalls. Most jurisdictions require a building permit for the racking and structural work and an electrical permit for the array wiring, plus a final inspection before the system can be energized.
What the Permit Package Needs
A complete submittal saves weeks. Most plan reviewers want to see:
- Site plan showing the array footprint, setbacks, drainage paths, and roof access
- Structural details for the racking, including the manufacturer's engineering report and ballast or penetration schedule
- Electrical single-line diagram showing modules, inverter, disconnects, and grounding
- Equipment cut sheets for panels, inverter, and racking
- Contractor licensing and insurance information
Missing any one of these is the most common cause of a permit rejection or a correction cycle.
The Inspection Sequence
Inspections usually happen in stages, not all at once:
- Rough-in inspection after racking and conduit are installed but before panels cover the work.
- Electrical inspection of wiring, grounding, and disconnects.
- Final building inspection confirming the array matches the approved plans.
- Utility permission to operate before the system is energized.
Inspectors look for specific things: racking fastened or ballasted per the engineering report, conduit supported and protected, grounding conductors bonded correctly, disconnects labeled and accessible, and flashing that will not leak. A slow, planned install passes these on the first visit; a rushed one gets correction notices.
Utility Permission to Operate
After the final inspection passes, the utility reviews the interconnection application and issues permission to operate. Only then should the system be energized. The National Renewable Energy Laboratory solar permitting resources tracks how local permitting and interconnection processes work across jurisdictions.
Common Permit and Inspection Mistakes
- Submitting plans without the rack manufacturer's engineering report
- Changing the array layout in the field without an approved revision
- Leaving conduit unsupported or unprotected where it crosses the roof
- Skipping the rough-in inspection and covering work with panels
- Energizing before permission to operate arrives
Each one is avoidable with a planned submittal and a staged inspection schedule.
Step 6: Mount, Wire, and Commission the System
Mounting comes down to layout discipline. Snap chalk lines, set the rack feet or ballast trays, and torque every fastener to spec. Then check the array for square before the panels go on.
Wiring follows code. Run conduit, protect connections, and label everything. Commissioning means testing open-circuit voltage, checking grounds, and confirming the inverter communicates.
Common Mistakes to Avoid
- Skipping the structural check on older roofs
- Mixing sealants that attack the membrane
- Setting rows too close and causing shade losses
- Leaving wire exposed to foot traffic
- Energizing before inspection
Each one is avoidable with a slow, planned install.
Flat roof solar is a roofing project before it is an electrical one. If your membrane is aging or your framing is uncertain, the smart move is to fix the roof and the array together. Times Square Remodeling Inc. is a California licensed general contractor (License #953868) with more than 15 years of experience in roofing and energy-efficient upgrades.
Frequently Asked Questions
Can solar panels be installed on a flat roof?
Yes. Flat roofs are common candidates for flat roof solar because panels can be mounted on ballasted or penetrating racks without cutting into the waterproof membrane in most ballasted setups. The key is confirming the roof can carry the added load, choosing a mounting system rated for your wind zone, and pulling the right solar panel installation permits and inspections before work starts. A structural check and a roof condition assessment should come first.
Do solar panels need to be tilted on a flat roof?
They do not have to be, but a tilt of roughly 10 to 15 degrees usually improves output and helps rain wash dust off the glass. Flat-mounted panels produce less during winter and low-sun months. The trade-off is row spacing: tilted panels cast longer shadows, so you need wider gaps between rows. Your installer should model the tilt angle for flat roof solar panels against your specific latitude and available square footage.
What mounting system works best for a flat roof?
Ballasted racking is often the default for flat roofs because it uses weighted blocks instead of roof penetrations, which protects the membrane. Penetrating racks are better when the roof structure cannot handle the ballast weight or when wind uplift is a concern. The right choice depends on your flat roof solar panel roof load requirements, local wind exposure, and membrane type. A licensed contractor can run the numbers before ordering hardware.
Should a professional install solar panels on a flat roof?
For most homeowners, yes. Flat roof solar work involves structural load calculations, wind uplift ratings, waterproofing details, and solar panel installation permits and inspections that vary by jurisdiction. Mistakes in flashing or ballast placement can void a roof warranty or cause leaks. A licensed contractor carries the insurance and pulls the permits. DIY is only realistic for small off-grid setups on a shed or detached garage.