 ultimate-guide
Fire Damage Restoration Process Explained: Step by Step
Last Updated: October 22, 2026
Quick Summary
Fire damage restoration is the staged process of securing a fire-damaged property, removing soot, smoke residue, and water, then repairing and rebuilding to its pre-loss condition. The work moves through assessment, emergency response, damage removal, cleaning, and reconstruction, and skipping a stage usually shows up later as lingering odor or hidden moisture.
- Do not re-enter a fire-damaged home; floors, ceilings, and stairs can fail without warning.
- Most fire restoration projects run 2 to 12 weeks depending on severity.
- Extraction comes first, then airflow, then dehumidification, with moisture readings logged daily.
- Porous materials like drywall, insulation, and upholstery usually cannot be cleaned and are replaced.
- Ask whether your policy pays replacement cost or actual cash value before prioritizing the scope.
Table of Contents
- What to Do After a House Fire: First 24 Hours
- Fire Damage Restoration Steps: From Assessment to Rebuild
- Fire Restoration Timeline: How Long Each Phase Takes
- Smoke and Soot Cleanup: Removing Residue and Odor
- Water Damage from Firefighting: Drying and Dehumidification
- Insurance Claims and Adjuster Coordination
- Restoration vs. Replacement: Making the Call
- Choosing a Fire Damage Restoration Contractor
- Frequently Asked Questions
What to Do After a House Fire: First 24 Hours
The first 24 hours after a house fire decide how much of your home can be saved. The fire damage restoration process explained here starts with that window: get everyone safe, call your insurer, and keep out of the structure until a professional clears it.
A house fire is rarely a total loss. Most damage comes from smoke, soot, and the water used to put the flames out, and each of those is treatable if it is addressed early.
Here is what to do, in order:
- Account for everyone. Confirm all occupants and pets are safe, and get medical attention for anyone with burns or smoke inhalation.
- Do not re-enter. Fire-damaged floors, ceilings, and stairs can fail without warning. The U.S. Fire Administration's fire safety guidance is blunt on this point: re-entry is for professionals with protective equipment.
- Call your insurance company. Report the loss and ask what documentation they need before anything is moved or cleaned.
- Secure the property. Boarded windows and a tarped roof stop rain, animals, and theft from adding to the damage.
- Photograph everything before cleanup begins, including contents you plan to discard.
- Stay out of the debris. Ash and soot contain fine particulates that irritate lungs and skin.
Fire Damage Restoration Steps: From Assessment to Rebuild
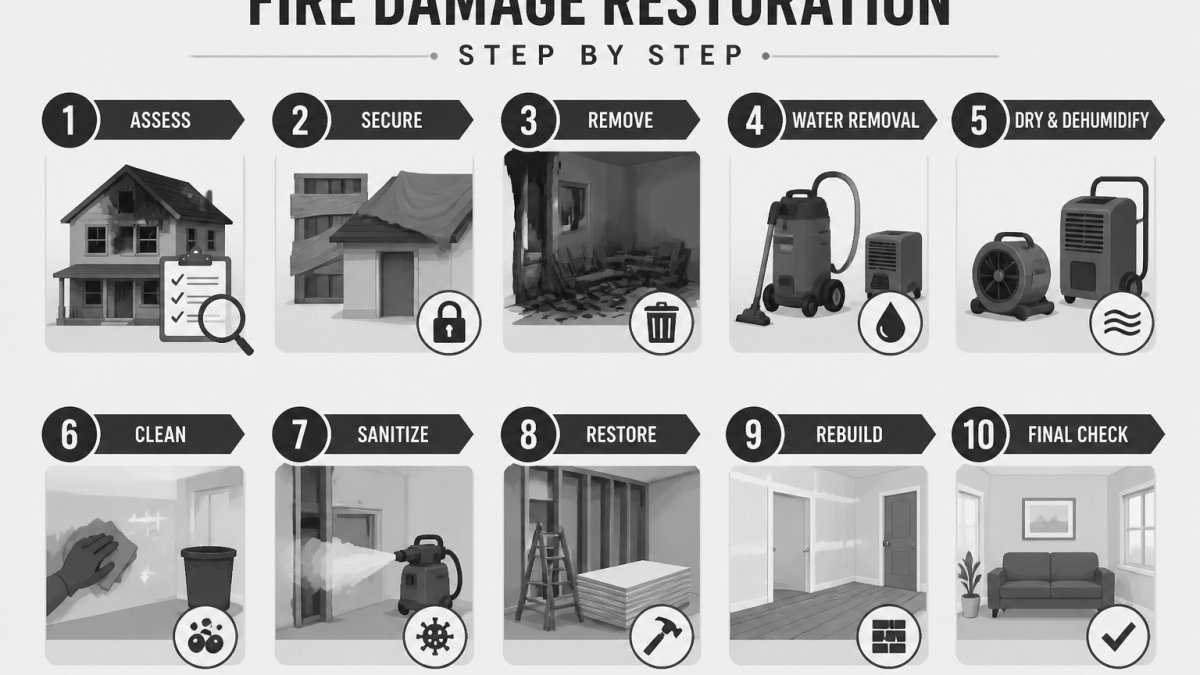
Fire damage restoration is the staged process of securing a fire-damaged property, removing soot, smoke residue, and water, then repairing and rebuilding to its pre-loss condition. The work moves through assessment, emergency response, damage removal, cleaning, and reconstruction, and skipping a stage usually shows up later as lingering odor or hidden moisture.
Step 2: Emergency response and property security. Board-up, roof tarping, and temporary power keep the structure weathertight and discourage theft.
Step 3: Water extraction and structural drying. Firefighting water soaks framing, insulation, and subfloor.
Step 4: Debris removal and damaged-material disposal. Charred drywall, insulation, and flooring come out so the remaining structure can be cleaned and inspected.
Step 6: Repairs and reconstruction. Framing, drywall, roofing, cabinetry, and finishes are rebuilt to match the pre-loss condition.
| Phase | Typical Duration | What Happens |
|---|---|---|
| Assessment and inspection | 1-2 days | Damage mapped, scope documented for the insurer |
| Emergency response and security | Day 1 | Board-up, tarping, temporary power |
| Water extraction and drying | 3-5 days | Extraction, air movers, dehumidifiers |
| Smoke and soot cleanup | 3-10 days | Surface cleaning, contents salvage, deodorization |
| Repairs and reconstruction | 1-8 weeks | Framing, drywall, roofing, finishes |
Fire Restoration Timeline: How Long Each Phase Takes
Most fire restoration projects run 2 to 12 weeks depending on severity. Minor damage with limited smoke penetration often wraps in 1-2 weeks. Moderate damage involving water extraction and partial reconstruction typically takes 3-5 weeks.
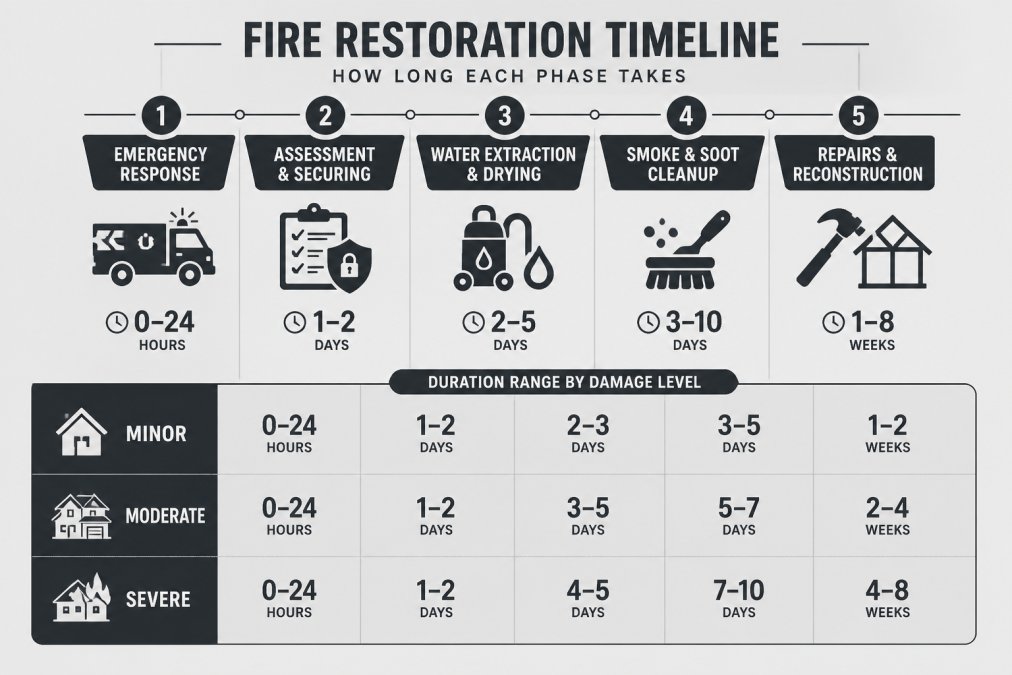
The single biggest variable is not the fire itself. It is how quickly drying starts and how long the insurance scope takes to approve. A project with an approved scope on day three moves twice as fast as one still waiting on an adjuster visit.
Smoke and Soot Cleanup: Removing Residue and Odor
Smoke and soot cleanup removes the acidic residue that etches metal, stains walls, and holds odor inside porous materials. Cleaning starts at the top of each room and works down, because soot settles and re-soils anything cleaned below it first.
Odor removal is a separate job from surface cleaning. Deodorization uses thermal fogging, ozone treatment in unoccupied spaces, or hydroxyl generators to reach the same cavities smoke penetrated.
- Porous materials such as drywall, insulation, and upholstery usually cannot be cleaned and are replaced.
- Hard surfaces including tile, metal, and sealed wood can often be cleaned and sealed.
- HVAC systems need duct cleaning, or every future air cycle redistributes residue.
Water Damage from Firefighting: Drying and Dehumidification
Water damage from firefighting water is often the most overlooked part of the fire damage restoration process. Hose streams leave hundreds of gallons inside walls, ceilings, and subfloors, and that moisture creates a second problem if it sits.
The sequence matters. Extraction comes first, then airflow, then dehumidification, with moisture readings logged daily until materials reach a dry standard. A contractor who skips the readings is guessing.
Insurance Claims and Adjuster Coordination
Insurance claims and adjuster coordination run on documentation. Your policy covers the loss, but the payout follows the scope of work, and the scope follows the evidence.
A practical timeline for the claim looks like this:
- Day 0-1: Report the loss to your insurer. Ask for the claim number, the name and contact information of the assigned adjuster, and a written list of what they need before anything is moved, cleaned, or discarded. Ask specifically whether your policy covers additional living expenses (ALE) and what receipts they require.
- Day 1-3: Photograph and video every room before cleanup begins, wide shots, close-ups of damage, and serial or model numbers on major appliances and electronics. Build a written inventory of damaged contents room by room, noting age, condition, and approximate replacement cost. Keep damaged items until the adjuster has seen them or has authorized disposal in writing.
- Day 2-5: Get a written scope of work and estimate from your restoration contractor. The scope should separate emergency services (board-up, tarping, water extraction), cleaning and deodorization, and reconstruction, because insurers often handle these as distinct line items.
Ask your contractor three questions before work starts: Will you document the loss with photos and moisture readings, will you meet the adjuster on site, and how do you handle change orders if hidden damage appears? A restoration contractor who documents thoroughly makes the adjuster's job easier, and that shortens the approval timeline.
One more point worth raising with your insurer early: ask whether the policy pays replacement cost or actual cash value. Replacement cost covers what it takes to replace the item today; actual cash value pays depreciated value. The difference can be substantial on older roofs, appliances, and furnishings, and it shapes how you and your contractor prioritize the scope.
Restoration vs. Replacement: Making the Call
Restoration versus replacement comes down to three tests: structural integrity, contamination level, and cost relative to replacement. The hard part is not knowing the tests, it is knowing how each one is actually evaluated, because the wrong call on either side costs you. Restoring something that should have been replaced leaves odor or weakness behind; replacing something that could have been saved inflates the claim and delays the project.
Structural integrity. The question is whether the material still carries its intended load or can be returned to that condition.
Contamination level. Smoke residue is acidic and penetrates porous materials. The test is whether the material can be cleaned to a level that will not release odor or residue later.
Cost relative to replacement. When repair cost approaches replacement cost, replacement is the cleaner answer, but the comparison has to be honest.
- Restore when the material is structurally sound, cleanable to a verifiable standard, and the repair cost is clearly below replacement.
- Replace when structural damage, deep smoke penetration, or contamination makes restoration unreliable, or when the repair cost is close to replacement.
- Document either decision with photos, moisture readings, and a written rationale for the adjuster. The rationale is what turns a judgment call into an approved line item.
Choosing a Fire Damage Restoration Contractor
Choosing a fire damage restoration contractor is where most homeowners lose time and money. Verify the license, ask for proof of insurance, and confirm the company handles both cleanup and reconstruction.
At Times Square Remodeling Inc., we are a California-licensed general contractor, license #953868, and we handle restoration through rebuild as one project with one point of contact. That matters when hidden damage turns up mid-project: you get a documented change order, not a surprise invoice.
Ask every contractor you interview:
- Are you licensed and insured, and can I see the license number?
- Do you handle reconstruction in-house or subcontract it?
- Will you meet my adjuster on site?
A house fire leaves you managing safety, insurance, and construction at the same time, and the decisions in the first week shape the whole project. Times Square Remodeling Inc. brings 15+ years of licensed general contracting experience to fire and smoke restoration, handling assessment, cleanup, and full reconstruction under one roof so you are not coordinating separate crews.
Frequently Asked Questions
What are the steps involved in fire damage restoration?
The fire damage restoration steps typically follow this order: emergency response and property security, a full damage inspection and property assessment, water extraction from firefighting, structural drying and dehumidification, smoke and soot cleanup, debris removal, and finally repairs or reconstruction. Each phase builds on the last, so skipping the assessment or drying stage usually causes bigger problems later. A licensed contractor can walk you through the sequence for your specific property.
How long does fire damage restoration take?
The fire restoration timeline depends on the extent of damage. Minor damage with limited smoke penetration often takes 1-2 weeks for cleanup and basic repairs. Moderate damage involving structural repairs and contents cleaning usually runs 3-5 weeks. Severe damage requiring reconstruction can take several months. Weather, insurance approvals, and material availability also affect the schedule, so ask your contractor for a written timeline before work begins.
What should homeowners do immediately after a fire?
After the fire department clears the property, do not re-enter until officials confirm it is safe. Contact your insurance company to start a claim, document damage with photos before anything is moved, and keep receipts for temporary housing and emergency expenses. Avoid touching soot or attempting cleanup yourself, since smoke residue is a health hazard. Then schedule a professional assessment to determine the scope of fire damage restoration needed.
How are smoke and soot removed after a fire?
Smoke and soot cleanup starts with containment to stop residue from spreading, then dry removal using HEPA vacuums and specialized sponges. Porous materials like insulation and drywall may need removal. Surfaces are cleaned with appropriate agents, and odor removal often uses thermal fogging or ozone treatment. Air quality is verified at the end. Proper deodorization matters because smoke odor can return if residue is left in hidden cavities.
Can a home be occupied during fire damage restoration?
In most cases, no. Even minor damage can leave smoke residue, contaminated air, and safety hazards like compromised wiring or weakened structures. Restoration work also generates dust and noise. Your contractor and insurance adjuster can confirm when the property is safe and livable again. If you must stay nearby, ask about securing the property during the project and document any additional living expenses for your claim.
Does homeowners insurance cover fire damage restoration?
Most standard homeowners policies cover fire damage, including the structure, contents, and additional living expenses while you are displaced. Keep detailed documentation: photos, receipts, and a written inventory of damaged items. Your adjuster will coordinate with the restoration contractor on scope and estimates. Review your policy limits and deductibles early, and ask the contractor to provide line-item estimates that match the adjuster's format to speed approval.