 listicle
Cost of ADU Construction in California: 2026 Guide
Table of Contents
- What Drives ADU Construction Cost in California
- Detached vs Attached vs Junior ADU: How Type Affects Price
- ADU Permit Fees and Impact Fees in California
- Prefab vs Stick-Built ADU Costs
- ADU Construction Timeline: Where the Months Go
- The Hidden Costs Most Budgets Miss
- How to Control ADU Construction Cost Before You Break Ground
- Frequently Asked Questions
Last Updated: September 24, 2026
What Drives ADU Construction Cost in California
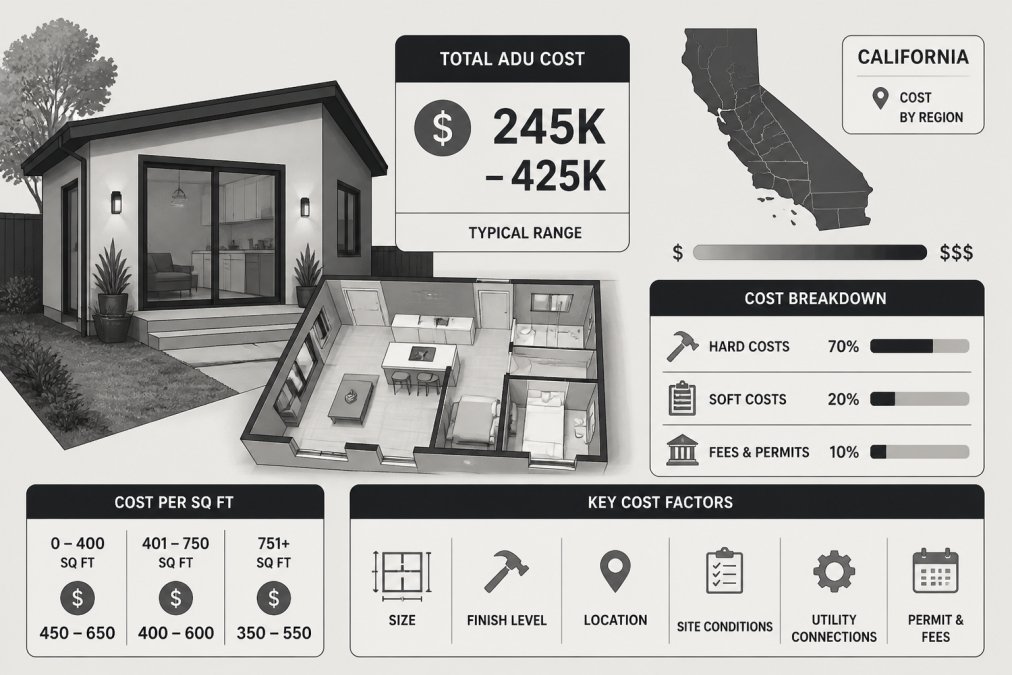
The cost of ADU construction in California is driven by two forces: the physical work of building the unit and the regulatory work of getting it approved. Understanding the split between hard costs, soft costs, and site conditions is the only way to build a realistic budget.
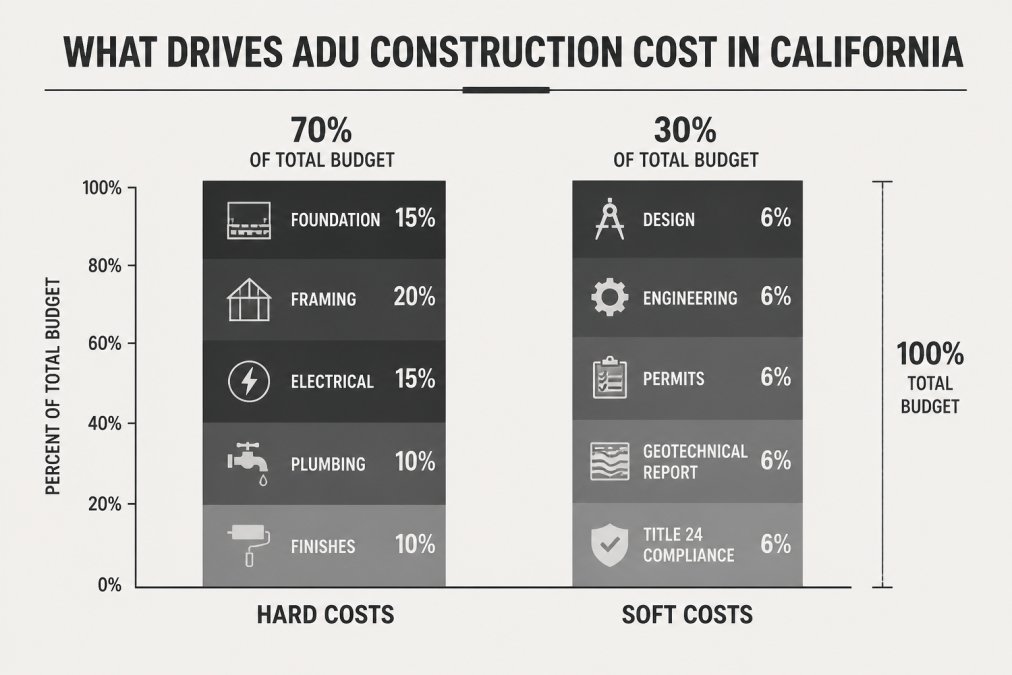
Hard Costs vs Soft Costs
Hard costs are the materials and labor that go into the physical structure: foundation, framing, roofing, electrical, plumbing, and finishes.
Site Conditions That Change the Number
Two identical floor plans on two different lots rarely cost the same. Slope, soil, and access drive the difference.
- Slope: A flat lot needs a simple slab. A hillside lot may need a pier-and-beam foundation or retaining walls.
- Soil: A geotechnical report may reveal expansive clay, which requires deeper footings and added engineering.
- Access: If a crane or concrete truck can't reach the build site, every material gets carried in by hand.
Detached vs Attached vs Junior ADU: How Type Affects Price
Detached ADUs cost the most because they are fully independent structures. Attached ADUs cost less because they share the main home's foundation, walls, and roofline. Junior ADUs cost the least because they convert existing interior space.
| ADU Type | What It Involves | Relative Cost | Best For |
|---|---|---|---|
| Detached | Standalone structure, own foundation and utilities | Highest | Rental income, maximum privacy |
| Attached | Shares a wall with the primary home | Moderate | Smaller lots, faster permitting |
| Junior ADU | Converts existing space inside the home | Lowest | Family housing, no new footprint |
ADU Permit Fees and Impact Fees in California
Permit and impact fees are the most variable line in any ADU budget because they are set locally, calculated differently, and assessed at different points in the project. Two identical units in neighboring jurisdictions can carry materially different fee loads.
How Building Permit Fees Are Calculated
Most building departments calculate the permit fee as a percentage of the declared construction valuation, using a published fee schedule. The valuation is not the contract price, it is the estimated cost of the work as the jurisdiction defines it, often derived from a square-foot table the city maintains. That means the same drawings can produce different permit fees depending on how the valuation is stated on the application.
A typical building permit fee covers:
- Plan check, charged when drawings are submitted for review
- Building permit issuance, charged when the permit is pulled
- Mechanical, electrical, and plumbing sub-permits, sometimes bundled, sometimes separate
- Fire sprinkler or fire-rated assembly review, if the unit triggers it
- Encroachment or right-of-way permits, if work touches the sidewalk or street
Impact Fees: What Actually Applies
Impact fees are one-time charges that offset the cost of public infrastructure the new unit is presumed to use, schools, parks, roads, water, and sewer. They are the fees that surprise homeowners most, because they are assessed by a different department than the building permit and often appear late in the process.
- Units under 750 square feet are generally exempt from impact fees altogether.
- Units 750 square feet and larger may be charged impact fees, but typically on a proportional basis rather than the full single-family rate.
- Junior ADUs created within the existing footprint of the home are generally exempt.
The Fee Categories That Catch Homeowners Off Guard
- School district fees, which are assessed separately from city fees and are governed by their own schedules.
- Park and recreation fees, common in jurisdictions with dedicated parkland ordinances.
- Utility connection fees, charged by the water, sewer, and power providers, not the city, and often calculated by meter size or fixture count.
- Sewer capacity charges, which can be substantial on lots where the existing lateral is undersized.
- Fire authority fees, if the unit triggers a review by a separate fire district.
How to Verify Your Actual Fee Load Before You Sign
- Request the current ADU fee schedule from the planning department in writing.
- Ask specifically whether school and park fees apply to your unit size and configuration.
- Confirm utility connection fees directly with each utility provider, the city will not quote them.
- Ask whether fees are due at submission, at issuance, or at final inspection, because the timing affects your construction loan draws.
- Get the fee assumptions written into your construction contract so a schedule change does not become your problem.
California Department of Housing and Community Development ADU guidance
Prefab vs Stick-Built ADU Costs
Prefab ADUs are built in a factory and assembled on site. Stick-built ADUs are framed on your property. Prefab usually shortens the on-site timeline and reduces weather delays; stick-built gives you full control over dimensions and finishes.
ADU Construction Timeline: Where the Months Go
The ADU construction timeline runs from the first feasibility conversation through final inspection, and on most projects the majority of elapsed time is spent before the first shovel hits the ground. Homeowners who plan around that reality avoid the frustration of a stalled project; homeowners who assume construction is the long pole end up surprised.
Phase 1: Feasibility and Site Review
This is where you confirm what the lot will actually allow. Zoning, setbacks, height limits, lot coverage, and parking requirements are checked against the specific parcel, not the general ordinance. Utility capacity is assessed here as well, panel size, water service size, and sewer lateral condition. Upgrading these existing systems often necessitates a tankless water heater installation to meet the increased demand of a new dwelling unit without exceeding current electrical or plumbing capacities.
Phase 2: Design and Engineering
Architectural drawings, structural calculations, and Title 24 energy documentation are produced in this phase. On a straightforward detached unit, this is typically measured in weeks. On a hillside lot, a lot with an existing non-conforming structure, or a project that requires a variance, it can stretch considerably longer because each iteration feeds back into engineering.
Phase 3: Permit Submission and Plan Check
Plan check is the phase most likely to consume more time than expected. The first review cycle produces comments; the design team responds; a second review cycle follows. Projects that require discretionary review, design review, coastal review, or a variance, add a public hearing step on top of the ministerial plan check.
Phase 4: Construction
Once the permit is issued, construction of a detached ADU typically proceeds through a predictable sequence:
- Site mobilization and demolition, if anything is being removed
- Excavation and foundation, including any utility trenching
- Framing and rough-in, with inspections at each stage
- Roofing, windows, and exterior finishes
- Insulation, drywall, and interior finishes
- Final utility connections and landscape restoration
Phase 5: Inspections and Final Sign-Off
Final inspection, utility meter set, and certificate of occupancy close out the project. This phase is short in itself but depends on every prior inspection having cleared.
What Actually Drives the Calendar
The variables that move the timeline most are not construction speed. They are:
- Whether the design is permit-ready on first submission, which depends on how well the feasibility phase was done
- Whether the jurisdiction requires discretionary review, which adds a hearing cycle
- Whether utility upgrades are discovered late, which can pause construction mid-stream
- Whether the contractor's schedule is sequenced with inspection availability, which varies by jurisdiction
The Hidden Costs Most Budgets Miss
Utility upgrades are the line item that breaks the most ADU budgets. An older home may need an electrical panel upgrade before it can carry a second dwelling, and a sewer lateral may need replacement to handle the added load.
Other costs that surface mid-project:
- Geotechnical reports, required on many hillside or fill lots
- Title 24 compliance, covering energy calculations and insulation requirements
- Drainage and grading, especially where a new structure changes water flow
- Landscape restoration, required by some cities after construction
How to Control ADU Construction Cost Before You Break Ground
A working checklist:
- Confirm zoning, setbacks, and maximum unit size with your city
- Order a geotechnical report if the lot is sloped or filled
- Have a licensed electrician assess panel capacity
- Camera-inspect the sewer lateral
- Get three itemized bids, not three lump sums
- Confirm permit and impact fees in writing
- Secure financing before signing a construction contract
Beyond the build itself, plan for long-term operating costs: maintenance, insurance, and any added property tax assessment. These do not appear in a construction quote, but they affect whether the unit pays for itself.
Frequently Asked Questions
How much does it cost to build a 1,200 sq ft ADU in California?
A 1,200 sq ft detached ADU sits at the larger end of what most California lots allow, so it carries the highest per-unit total. Cost depends on site conditions, foundation type, utility distance, finish level, and local permitting. Two identical floor plans can land far apart once a sewer lateral, electrical panel upgrade, or geotechnical report is factored in. Get a site-specific quote rather than relying on a generic per-square-foot figure.
What are the hidden costs of building an ADU?
The costs that surprise homeowners most are utility upgrades: a new electrical panel, a sewer lateral replacement, or a water line extension. Add geotechnical reports, Title 24 compliance documentation, and impact fees that vary by city. Site preparation on sloped lots, tree removal, and drainage work also add up. These items rarely appear in early estimates but can shift a budget significantly. Ask any contractor to itemize them in writing before signing.
Is it cheaper to build an ADU or add an addition?
An addition shares the existing foundation, roofline, and utility connections, so it typically costs less per square foot than a detached ADU that needs its own foundation, roof, and service runs. However, an ADU adds a separate living unit, which can generate rental income and raise property value differently than extra square footage on the main house. The right choice depends on your goal: more space for family or a rentable unit.
How does ADU size impact total construction cost?
Cost does not scale linearly with square footage. A 400 sq ft junior ADU still requires a foundation, a kitchenette, a bathroom, and utility connections, so the per-square-foot cost is highest at small sizes. A 900 to 1,200 sq ft detached unit spreads those fixed costs across more area, lowering the per-square-foot figure. The bigger driver is site work, not the floor plan itself.
What is the ADU construction timeline from permit to move-in?
Most California ADU projects run six to twelve months from permit submission to final inspection. Design and engineering take one to three months, plan check and permitting another two to four, and construction four to eight months depending on size and weather. Prefab units can compress the on-site build phase but still require site work, foundation, and utility hookups. Delays usually come from plan-check revisions, not the build itself.